


Wifi Color Touch Screen Thermostat For Boiler
SKU #6670193917988
Rodzaj: Hardware Thermostats
Dostępność: W magazynie
Ceny od: $ 112.79
BEZPŁATNA ŚLEDZONA WYSYŁKA NA CAŁYM ŚWIECIE
?Main Display
1,WiFi indicator- Displayed when connected to a WiFi Network
2,Hold:Temperature Hold.
3,Adjusting the optional settings.
4,Day Indicator&Clock
5,Away:Means the MC6-HW is maintaining a lower temperature to give frost protection.
6,OPT(Optimum):Displayyed ON/OFF of the “Optimum Start”
7,Air Humidity:
1)If humidity value less than 30%,the pointer will be in the Red area.
2)If humidity value is between 30% and 60%,the pointer will be in the Green area.
3)If humidity value is more than 60%,the pointer will be in the Gray area.
8,Power ON/OFF
9,Holiday:Displayed when thermostat is in holiday mode.
10,Schedule:Programmable Operation.
11,Setup Button
12,13 Adjusting the Setting Temperature or Turn Page.
14,Setting Temperature display
15,Room Temperature display
16,? or ? Display
17,Displayed “ Heating” symbol
? Fearture Settings
Clock Setting
To set the clock,follow these steps.
?Click the icon and enter Feature Settings.
?Click The “Clock Setting”enter Setting Interface
?Click the column of Year/Month/Day,use the icon to set the Year/Month/Day values.
?Click the column of “Time”,use the icon to set Hours/ Minute.
?Click the icon to save and return to main display.
Backlight Setting
?Click the icon and enter Feature Settings.
?Click“Backlight”Seclection and enter Backlight Setting.
?Ambient Light Dimming is in Mode:Automatically adjust the backlight brightness.
?Ambient Light Dimming is in Mode:Manually adjust the backlight brightness.
?Use the icon to adjust to the desired brightness
?Click the icon to save and return to main display.
Standby Screen
?Click the icon and enter Feature Settings.
?Click “Standby Screen”and enter Setting interface.
?There are Four Selection(3Min,10Min,Just Night,Never) to controls the Standby Screen Time.
?For example, setting the standby time is for 10 minutes
Click the icon in the front of “10 Min” and it will turn to .
?Click the icon to save and return to main display.
Screen Lock
?Touch (Click on )the icon and enter Feature Settings.
?Click “Screen Lock”and enter setting interface.
Lock Pin Options
?For example, Setting the Lock Pin is 5209
?Click the First Column ,use the icon to set to 5
?Click the Second Column , use the icon to set to 2
?Click the Third Column ,use the icon to set to 0
?Click the Fouth Column ,use the to set to 9
?Click the icon to save and return to main screen.
Note:To unlock the MC6-HW press .The display will show and you will need to enter the four digit pin number you set previously.
Temperature Format
?Click the icon and enter Feature Settings.
?Find the “Temp Format” option,click it and enter setting interface.
?There are two Options /
?Click the icon in the front of or ,and it will turn to .
?Click the icon twice to save and return to main screen.
Temperature Limit
?Click the icon and enter Feature Settings.
?Find the “Temp Limit ” option,click it and enter setting interface.
?Click the First Column,use the icon to adjust Minimum Temperature to 5-34?
?Click the Second Column ,use the icon to adjust Maximum Temperature to 6-35?
?Click the icon twice to save and return to main screen.
Defrost
The thermostat automatically enter the Defrost Mode when the room temperature is drop below the defrost temperature.
?Click the icon and enter Feature Settings.
?Find the“Defrost” option,Click it and enter setting interface.
Temperature Options.
?Use the icon to adjust the temperature.
?Click the icon twice to save and return to main screen
Sensor Selection
There are five options:
Built in Sensor(Default)
Remote Air Sensor
Floor Sensor Only
Built in &Floor Sensor
Remote Air &Floor Sensor
?Click the icon and enter Feature Settings.
?Find the “Sensor Selection” option,Click it and entry in setting interface.
?Click the icon of which sensor you required.
?Click the icon twice to save and return to main screen.
Floor Temperature Limit
?Click the icon and enter Feature Settings.
?Find the “Floor Temp Limit” option,Click it and entry in setting interface.
?Use the icon keys to set the temperature.
?Click the icon twice to save and return to main display.
Daylight Saving Time
?Click the icon and enter Feature Settings.
?Click “DST”and enter setting interface.
Auto DST Options
?There are three options:
European Union/US&Canada/Australia&New Zealand
?Click the icon in the front of “EU/U&C/A&Z” and it will turn to .
?Click the Keys to save and return to main screen.
System Information
?Click the icon and enter Feature Settings.
?Click “System Information”and enter interface,and it shows
Version Number:2.0
?Click the Keys to Exit
Reset To Factory Settings
?Click the icon and enter Feature Settings.
?Click “ ”and enter setting interface.
?Click “Reset” to factory settings
?Click the Keys to Exit.
Warning:Reset will make you lost the current Settings and return to the factory Settings.
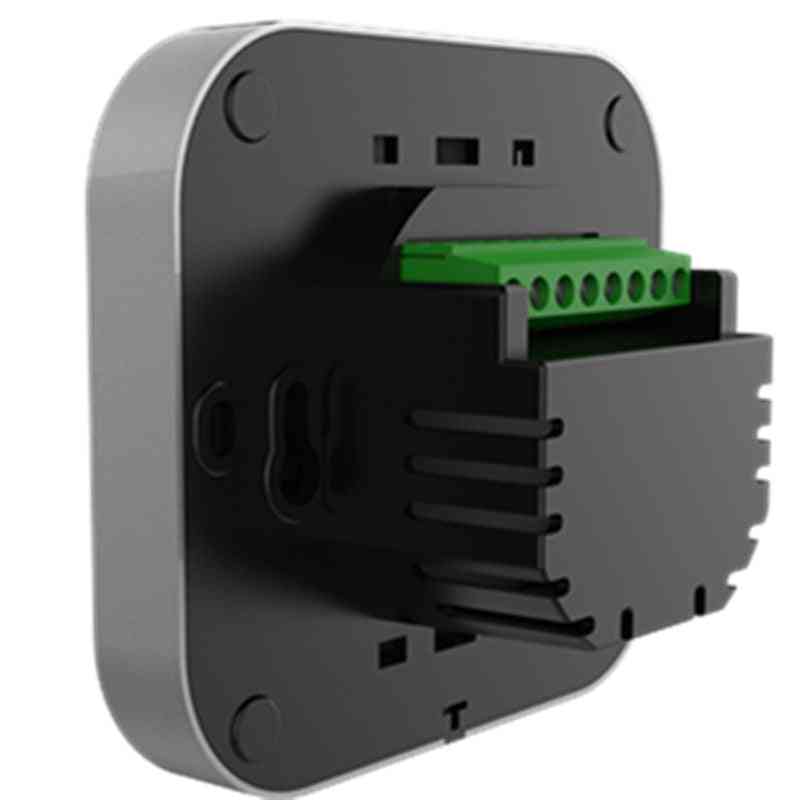
Installation
Install the

Produkt nie pasuje do opisu? Skontaktuj się z nami w ciągu 30 dni od jego otrzymania!
W przypadku rezygnacji pieniądze zostaną zwrócone na Twoje konto w ciągu 3 dni.
1,WiFi indicator- Displayed when connected to a WiFi Network
2,Hold:Temperature Hold.
3,Adjusting the optional settings.
4,Day Indicator&Clock
5,Away:Means the MC6-HW is maintaining a lower temperature to give frost protection.
6,OPT(Optimum):Displayyed ON/OFF of the “Optimum Start”
7,Air Humidity:
1)If humidity value less than 30%,the pointer will be in the Red area.
2)If humidity value is between 30% and 60%,the pointer will be in the Green area.
3)If humidity value is more than 60%,the pointer will be in the Gray area.
8,Power ON/OFF
9,Holiday:Displayed when thermostat is in holiday mode.
10,Schedule:Programmable Operation.
11,Setup Button
12,13 Adjusting the Setting Temperature or Turn Page.
14,Setting Temperature display
15,Room Temperature display
16,? or ? Display
17,Displayed “ Heating” symbol
? Fearture Settings
Clock Setting
To set the clock,follow these steps.
?Click the icon and enter Feature Settings.
?Click The “Clock Setting”enter Setting Interface
?Click the column of Year/Month/Day,use the icon to set the Year/Month/Day values.
?Click the column of “Time”,use the icon to set Hours/ Minute.
?Click the icon to save and return to main display.
Backlight Setting
?Click the icon and enter Feature Settings.
?Click“Backlight”Seclection and enter Backlight Setting.
?Ambient Light Dimming is in Mode:Automatically adjust the backlight brightness.
?Ambient Light Dimming is in Mode:Manually adjust the backlight brightness.
?Use the icon to adjust to the desired brightness
?Click the icon to save and return to main display.
Standby Screen
?Click the icon and enter Feature Settings.
?Click “Standby Screen”and enter Setting interface.
?There are Four Selection(3Min,10Min,Just Night,Never) to controls the Standby Screen Time.
?For example, setting the standby time is for 10 minutes
Click the icon in the front of “10 Min” and it will turn to .
?Click the icon to save and return to main display.
Screen Lock
?Touch (Click on )the icon and enter Feature Settings.
?Click “Screen Lock”and enter setting interface.
Lock Pin Options
?For example, Setting the Lock Pin is 5209
?Click the First Column ,use the icon to set to 5
?Click the Second Column , use the icon to set to 2
?Click the Third Column ,use the icon to set to 0
?Click the Fouth Column ,use the to set to 9
?Click the icon to save and return to main screen.
Note:To unlock the MC6-HW press .The display will show and you will need to enter the four digit pin number you set previously.
Temperature Format
?Click the icon and enter Feature Settings.
?Find the “Temp Format” option,click it and enter setting interface.
?There are two Options /
?Click the icon in the front of or ,and it will turn to .
?Click the icon twice to save and return to main screen.
Temperature Limit
?Click the icon and enter Feature Settings.
?Find the “Temp Limit ” option,click it and enter setting interface.
?Click the First Column,use the icon to adjust Minimum Temperature to 5-34?
?Click the Second Column ,use the icon to adjust Maximum Temperature to 6-35?
?Click the icon twice to save and return to main screen.
Defrost
The thermostat automatically enter the Defrost Mode when the room temperature is drop below the defrost temperature.
?Click the icon and enter Feature Settings.
?Find the“Defrost” option,Click it and enter setting interface.
Temperature Options.
?Use the icon to adjust the temperature.
?Click the icon twice to save and return to main screen
Sensor Selection
There are five options:
Built in Sensor(Default)
Remote Air Sensor
Floor Sensor Only
Built in &Floor Sensor
Remote Air &Floor Sensor
?Click the icon and enter Feature Settings.
?Find the “Sensor Selection” option,Click it and entry in setting interface.
?Click the icon of which sensor you required.
?Click the icon twice to save and return to main screen.
Floor Temperature Limit
?Click the icon and enter Feature Settings.
?Find the “Floor Temp Limit” option,Click it and entry in setting interface.
?Use the icon keys to set the temperature.
?Click the icon twice to save and return to main display.
Daylight Saving Time
?Click the icon and enter Feature Settings.
?Click “DST”and enter setting interface.
Auto DST Options
?There are three options:
European Union/US&Canada/Australia&New Zealand
?Click the icon in the front of “EU/U&C/A&Z” and it will turn to .
?Click the Keys to save and return to main screen.
System Information
?Click the icon and enter Feature Settings.
?Click “System Information”and enter interface,and it shows
Version Number:2.0
?Click the Keys to Exit
Reset To Factory Settings
?Click the icon and enter Feature Settings.
?Click “ ”and enter setting interface.
?Click “Reset” to factory settings
?Click the Keys to Exit.
Warning:Reset will make you lost the current Settings and return to the factory Settings.
Installation
Install the
GWARANCJA
Zwrócimy Ci pieniądze, jeśli przedmiot nie zostanie dostarczony w ciągu 40 dni od zakupu. Masz 2 tygodnie na złożenie wniosku o zwrot pieniędzy — do dnia 60.Produkt nie pasuje do opisu? Skontaktuj się z nami w ciągu 30 dni od jego otrzymania!
W przypadku rezygnacji pieniądze zostaną zwrócone na Twoje konto w ciągu 3 dni.
PODOBNE PRODUKTY
 Mechaniczny elektryczny, regulator temperatury, ogrzewanie podłogowe, termostat pokojowy
FREE SHIPPING
 Cyfrowy regulator temperatury termostatu przełącznik z gniazdem
FREE SHIPPING
 Inteligentny termostatyczny zawór grzejnikowy do regulacji temperatury układu ogrzewania siłownikiem grzejnikowym - 1szt
FREE SHIPPING
 Mikrokomputer-cyfrowy regulator temperatury, szklarnia z wyświetlaczem led;
FREE SHIPPING
 Wifi Smart Thermostat, Heating Temperature Controller
FREE SHIPPING
 Programowalny termostat wtykowy gniazdo eu, regulator temperatury
FREE SHIPPING